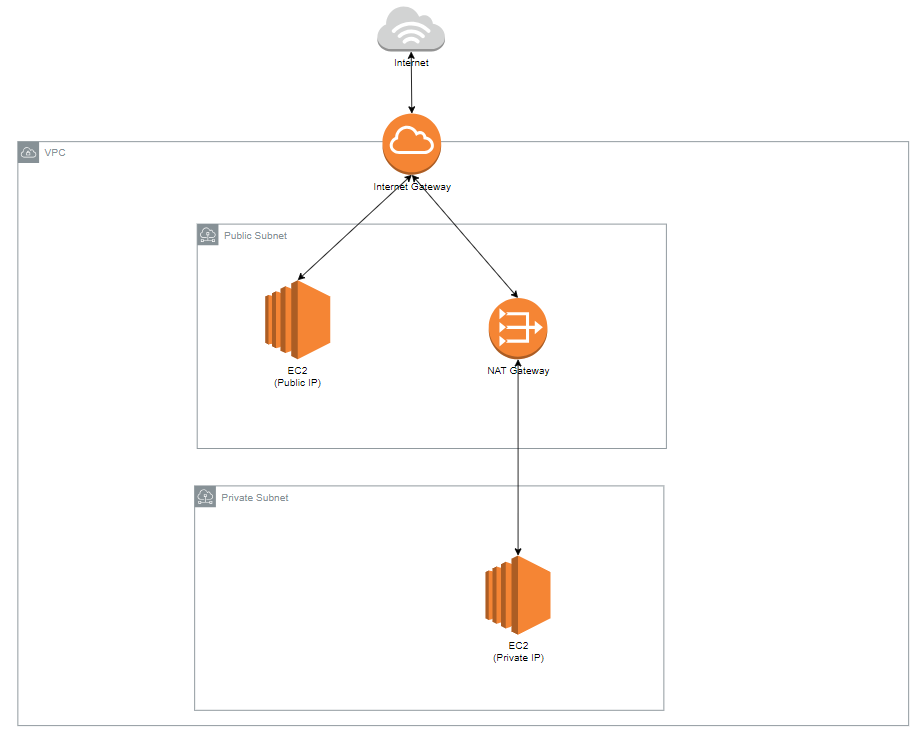
We will archive below network architect for this tutorial
I. Create VPC without IPAM (IP Address Manager)
1. Follow below steps to create a new VPC:
- Login to your AWS Management Console with your account (must have permissions to create VPC)
- Choose the region that you want to work with (N.Virginia, Ohio…)
- Choose service VPC from AWS Services
- From VPC Dashboard, click “Create VPC”
- Now, provide the information in the Create VPC Windows:
- “Resources to create”: There are two options
- “VPC only”: This will create a VPC only, other things like IG, NAT, Subnets…. must be created manually –> We will go with this option, so we will understand how things are created.
- “VPC and more”: This will create VPC along with IG, NAT, Subnets….
- “Name tag”: Put a name here, example “MyVPC”
- “IPv4 CIDR block”:
- Choose: “IPv4 CIDR manual input” (there is another option to use IPAM, we will learn about it in the next session of this tutorial)
- “IPv4 CIDR”: Put your CIDR, example “10.50.0.0/16” (for more information how to put the right CIDR, please refer to this tutorial. AWS CIDR Block)
- “IPv6 CIDR block”: For this tutorial, we will go with IPv4 only, so choose “No IPv6 CIDR block” (using IPv6 is an advance topic, I will create a new tutorial for IPv6 later)
- “Tenancy”:
- If you have no ideas about tenancy, go with “Default”: Default tenancy is shared for AWS customers and cheaper than below option.
- “Dedicated”: means we are the only customer running on the host, no shared. Which is more expensive.
- “Tags”: Label your resources, can be used for organizing resources, automation… or just give additional information. some examples:
- Environment: Prod | Dev | Test…
- CostCenter: <Name>
- Project: <ProjectName>
- …
- “Resources to create”: There are two options
2. Create an Internet Gateway
- From VPC Dashboard –> “Internet gateways”
- Click “Create internet gateway”: Input the Name and TAGs (if you want to) and Create it.
- Attach the Internet Gateway to the VPC that we have created before.
3. Create a Public Subnet & Public Routing Table
- Go to “Route tables” and create a new Route table
- Update the routing by adding a new Route “0.0.0.0/0” to the Internet Gateway
- Go to “Subnets” and create a new Subnet
- Update the subnet to use the Routing table that we have just created.
4. Create a NAT Gateway
- From VPC Dashboard, go to “NAT gateways” –> Create NAT gateway
- Put any Name
- Choose the subnet to provision the NAT gateway (must be public subnet)
- Connectivity type: public (there are some circumstances we need to use private NAT, which is not covered in this tutorial)
- Adding some TAGs
- “Create NAT gateway”
5. Create a Private Subnet & Private Routing Table
- Go to “Route tables” and create a new Route table
- Update the routing by adding a new Route “0.0.0.0/0” to the NAT Gateway
- Go to “Subnets” and create a new Subnet
- Update the subnet to use the Routing table that we have just created.
II. Create VPC using IPAM
Example as below picture:
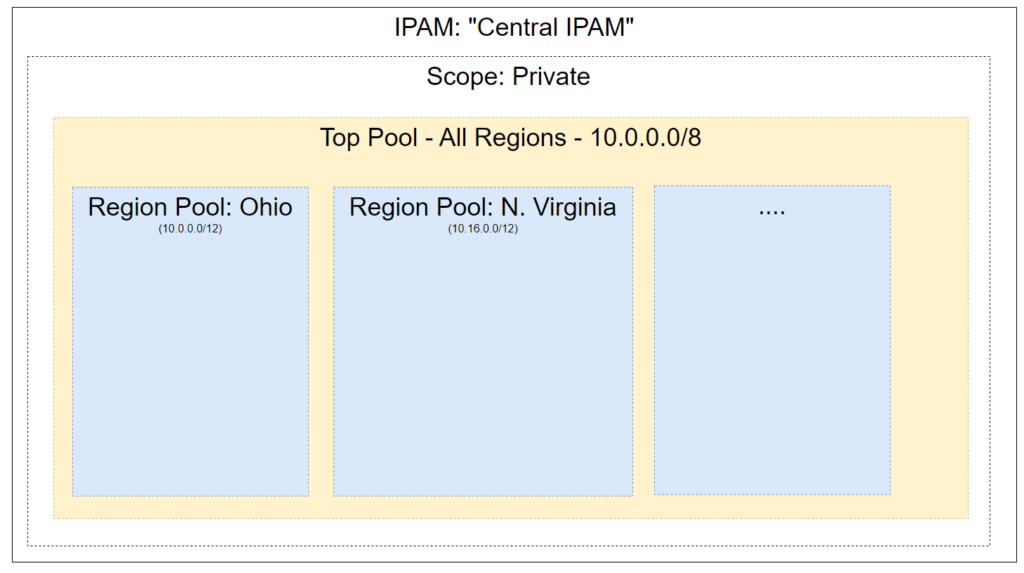
- Create an “IPAM”
- Create a top Pool (IPAM scope)
- Create Sub-Pool (IPAM pool)
- Create VPC using IPAM
Leave a Reply